ClimaDot - Climate Monitor
Monday, December 1, 2025
Project Goal:
The overall goal of this project was to create a climate monitor for students’ desks for a low cost. With modern internet capabilities, we can know the temperature, humidity, and more, outdoors by simply looking at our phones – however, we are often left guessing regarding the climate of our living spaces. Unfortunately, most sensors are either very expensive, or wrapped into even more expensive climate-control HVAC systems. Instead, the ClimaDot intends to provide a low-cost solution, which can live on the desk or wall of a student, and give information regarding the space it is in. Though it is more limited in scope than some other available solutions, it provides the information the user wants immediately, and cheaply.
Description of Project:
This project has two key functions, and two key input methods, which it then displays on a liquid crystal display. At the core of the project is an Arduino microcontroller, handling all programmatic logic. The two primary functions of the ClimaDot are providing data regarding temperature and humidity of the space it is in to the user. This is read through a DHT sensor, and presented through the LCD. As previously stated there are two primary modes of input: the IR remote, and tactile interfaces on the product. The IR remote is used to manage the requested page on the device, as well as power and temperature unit specifications, while the on-board interfaces are more one-time functions, or emergency switches. The first is a potentiometer which handles the contrast of the LCD, which should be configured at the startup of the device, and need little further adjustment. The second is the emergency power button – this enables or disables the device through a hardware interrupt function. All information regarding the user interface is viewable on-device through the LCD.
Intended Customer / User:
This product is specifically designed for students, or other individuals who frequently use desks, and is intended to specifically be low-cost. In terms of age range, a good estimate would be ages 16 - 45 – the general late-education and early-workforce age-range. Specifically related to geographic audiences, the target is English speaking first-world countries, such as the US, the UK, and Australia. For target occupations, this is for individuals with home-offices / study spaces, including, but not limited to: students, engineers, data scientists, machine learning specialists, teachers, content creators, and many more. Overall, this is intended as an accessible product, especially in cost, to a large array of individuals who frequently use desks.
Product Use Environment:
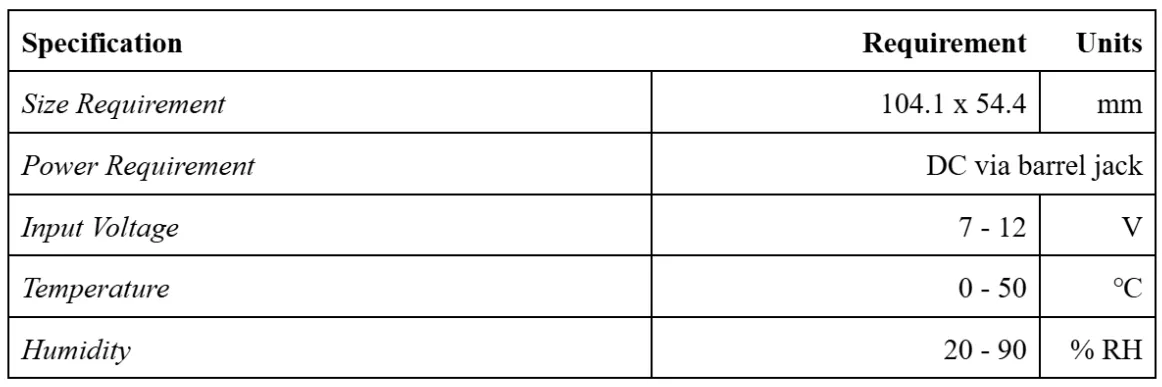
This product should be used indoors in either home or office settings. This indicates temperatures ranging 0 - 50℃, humidity from 20 - 90%, and low vibration and shock environments, beyond what could be expected from a busy desk-space.
Market Research:
The main issue with most alternatives on the market is cost. A standard desk weather station can cost anywhere from $30 - $75, which is out of the range of affordability for many students.
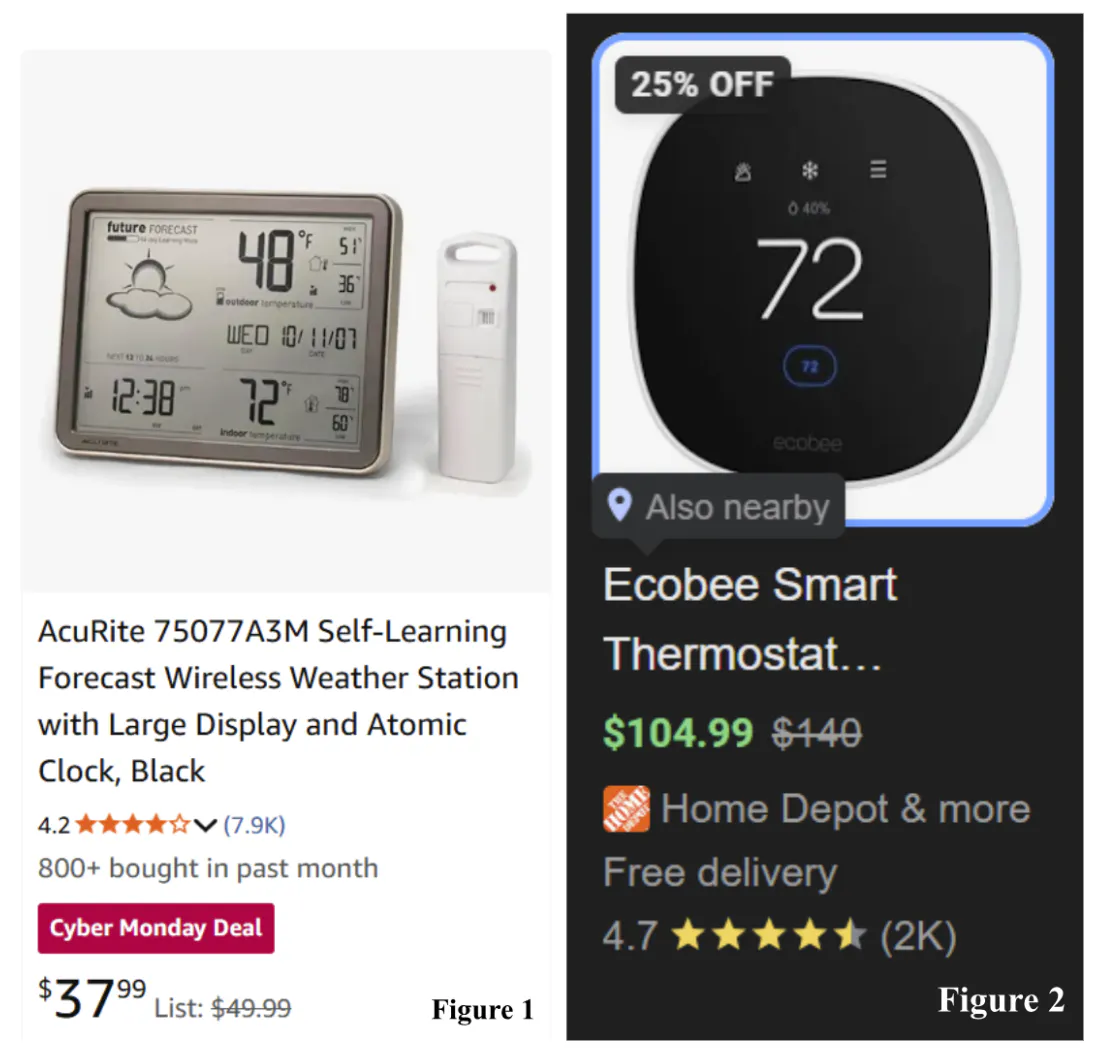
Please note that the options shown above are both on sale due to Black Friday deals, they are actually $50 and $140 respectively. As you can see above, these costs are significantly out of the range of most student budgets. Instead, ClimaDot intends to provide a more limited set of data, for a significantly smaller cost.
Customer Needs:
From a consumer perspective, there are two key things this product must fulfil. First, as discussed in depth, is the price-point. Ideally, this device should be cheap enough to be purchased by a university student for around $10 or lower. Second, it must provide the information the user wants from the product: the temperature and humidity of the space it is in. If these two criteria are met, the product is sure to satisfy consumer needs.
Performance Requirements:
Time & Costs:
Total Prototype Cost:
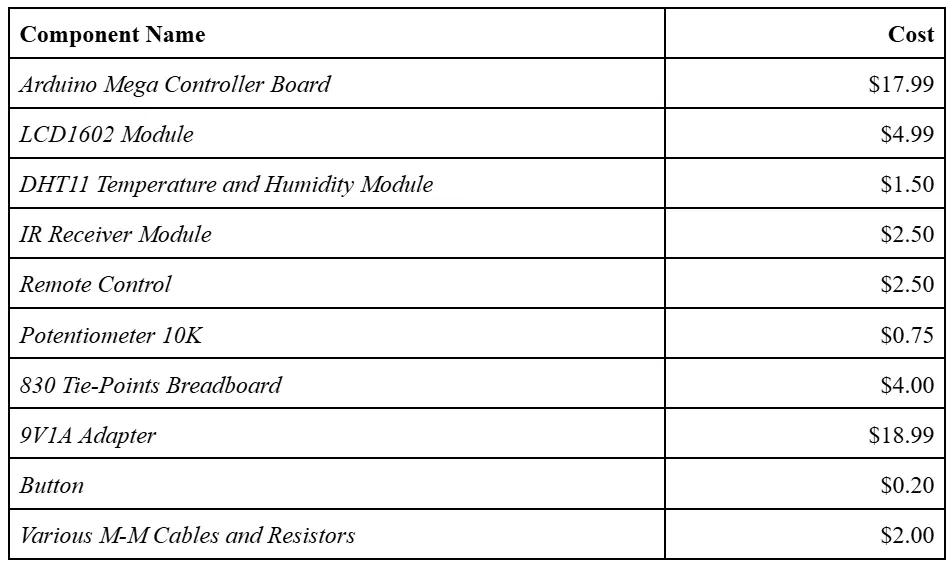
$55.41
Total Time:
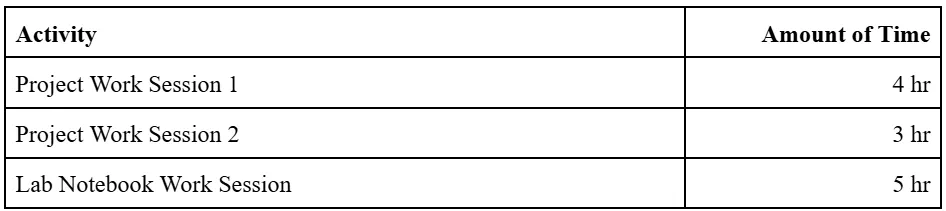
12 hr
Total Pay w/ Wage of $70.84/hr (Mean EE Pay per hour in CA):
$850.08
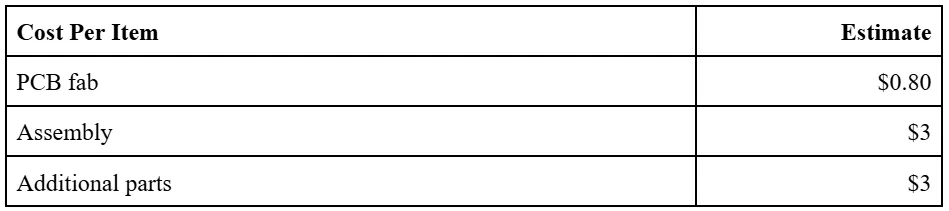
~$6.80 per unit
Ultimately, this is both a reasonable wage for an engineer designing this product, as well as being significantly below the self-required price-point of $10 – excellent!
Schematic:
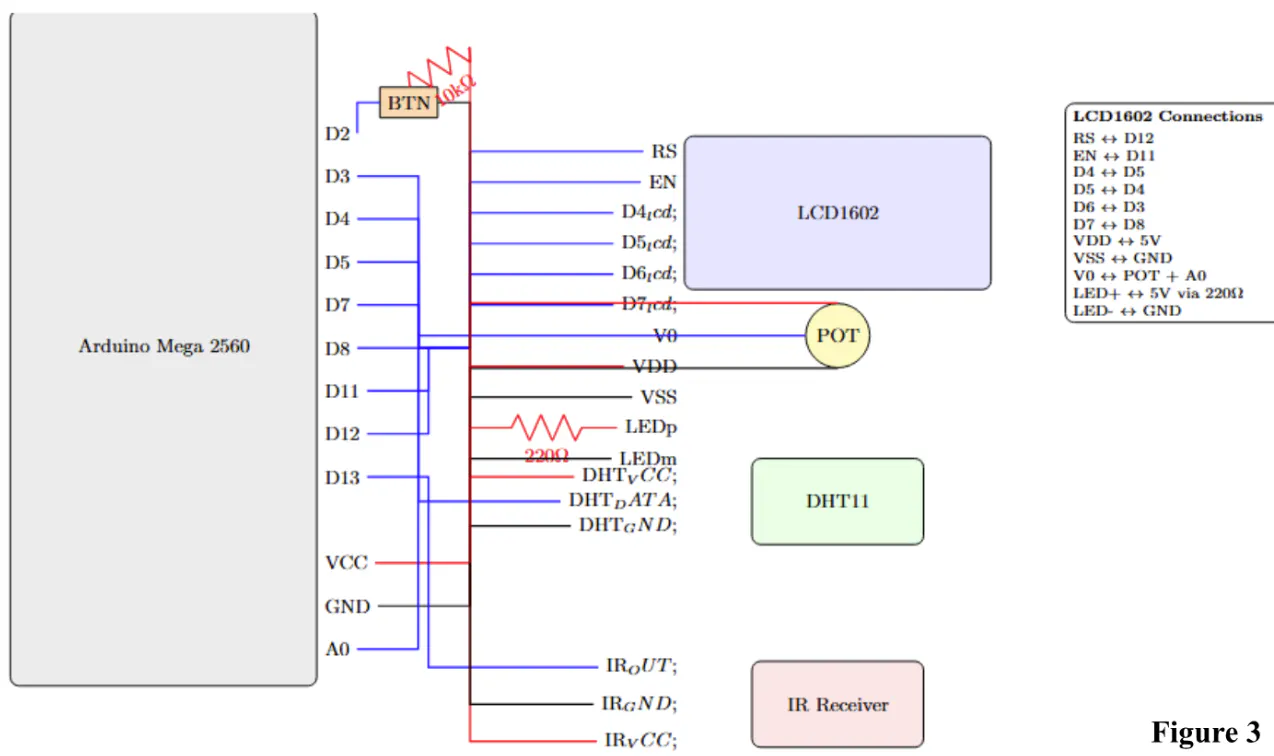
Though this schematic is quite complicated, it is rather straightforward. All of the components on the board (the LCD, potentiometer, button, DHT11, and the IR receiver) are all grounded and connected to the 5V supply. The LCD is a special case, having its backlight additionally grounded through a 220 Ω resistor, and its contrast input through the potentiometer, as well as being connected to A0 for reading. The DHT11 and IR receiver only have one output, each fed to a pin, and the button is the same, though to the D2 pin as it has interrupt capability. The remainder of the digital pins are for the LCD reading. I only did four of the eight, as I do not need the maximum speed (which is given by doing all eight) as the display is only updated during infrequent user input. The button is also connected to ground and 5V, though through a 10 kΩ resistor as well. Overall, though it may appear muddled and complex, it is quite simple if you simplify the pin connections and ignore the grounds and voltage connections when understanding the wiring.
Physical Layout:
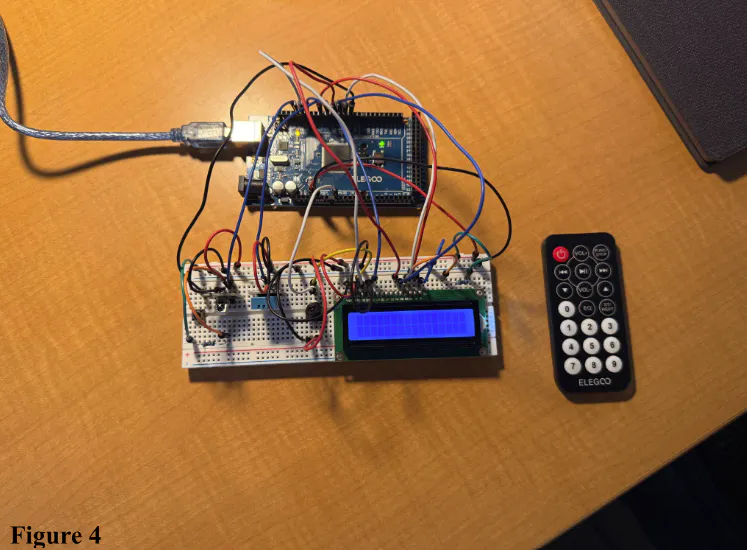
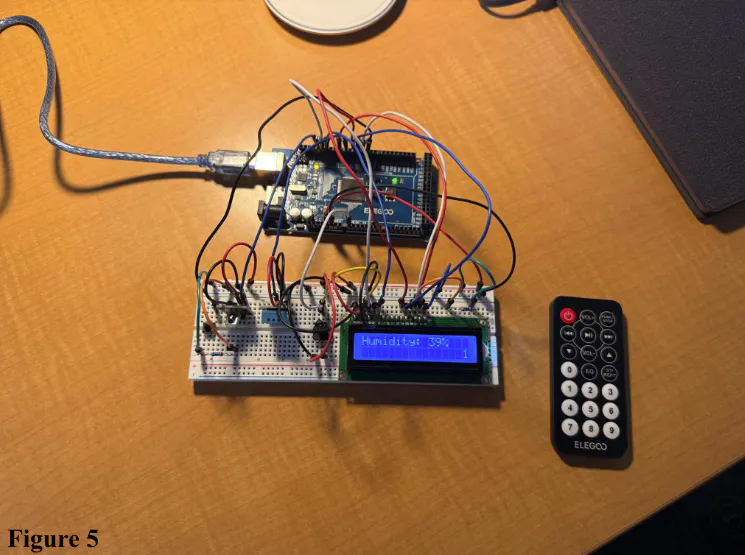
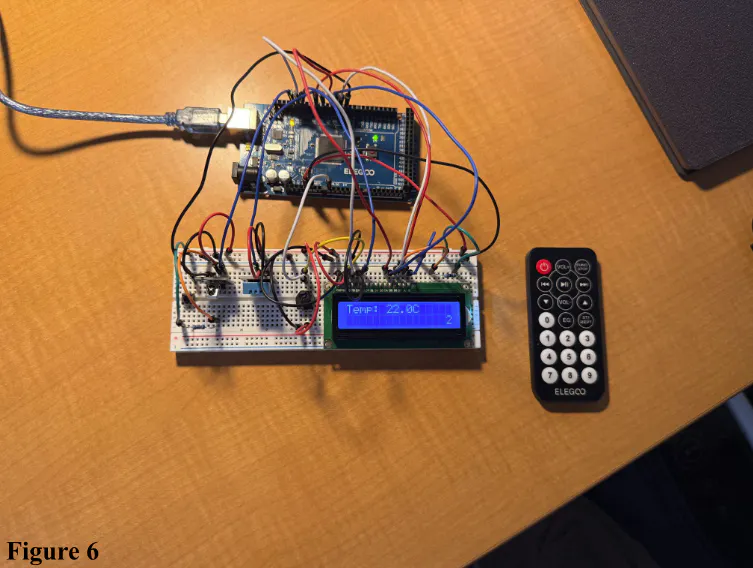
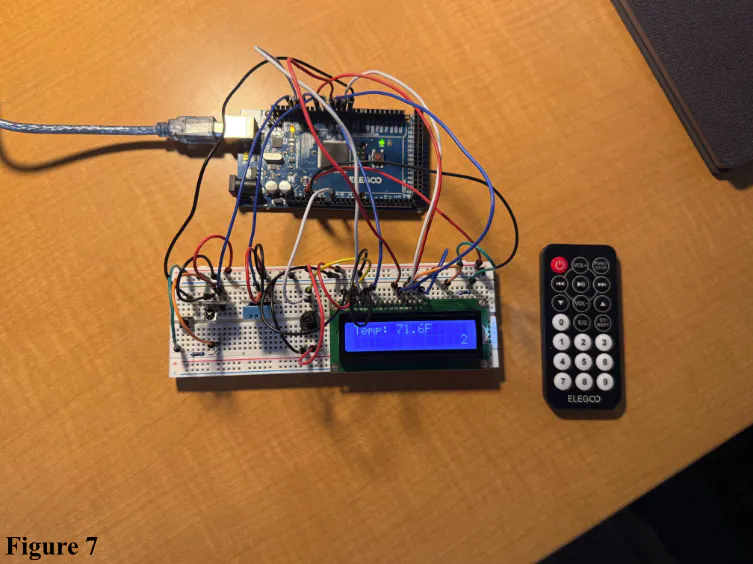
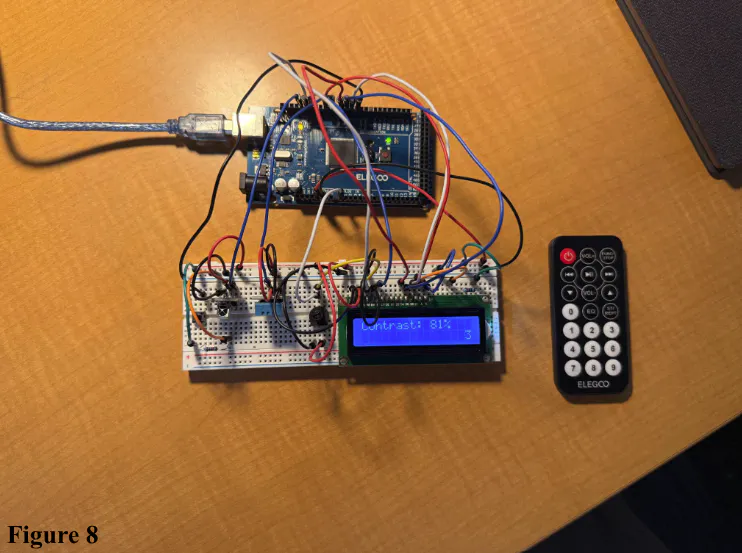
The figures above illustrate the various states of the product. Beginning with OFF, this state features nothing on the display and is triggered either by the physical button on the board, or the power button on the remote. The button on the board uses the hardware interrupt feature of the second digital pin. The humidity state is the first page, selected through button 1 on the remote, and displays the DHT sensor reading’s relative humidity. Similarly, the temperature is the second page, selected by button 2. Critically, however, this can be in different units – featuring either Celsius or Fahrenheit depending on what the user selects using the FUNC key; this value is in Celsius by default. Finally, the third page features the percent contrast of the display. This is converted from counts through the A0 pin, and is controlled by the potentiometer on the board. Overall, these different “states” or “pages” make up the user experience, and what is displayed, and is controlled by either the IR remote, or the potentiometer or power button on the board itself.
Code:
Explanation:
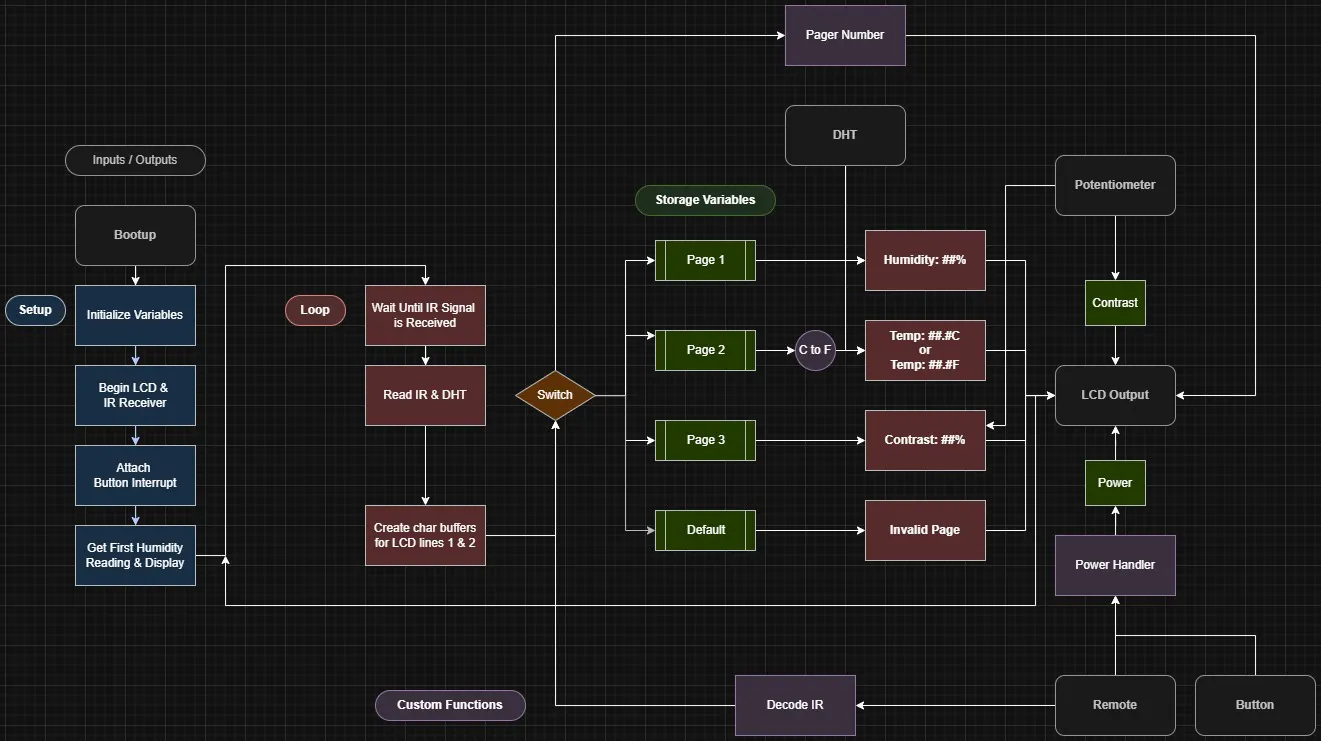
The program begins by importing all three necessary libraries – those for controlling the LCD, the DHT sensor, and the IR remote. Next, we define variables and pins for the LCD, the IR, remote, and the button and potentiometer, as well as defining the overarching objects for the various libraries’ functionalities. Finally, we also create some storage variables. An enum for the page state, a Celsius or Fahrenheit boolean, and a powered state boolean. In setup(), we begin the LCD display with 16 cols, and 2 rows, the IR reader through the library’s start command, and attach the button interrupt in pin 2 to the powerHandler function. We also run code, developed later, which initializes the device to the humidity screen. Next, in loop(), we use a while loop to wait until a signal is received before continuing. Then we read the input signal, read the DHT sensor, and prepare string buffers for the two rows on the LCD. Then, we run a switch statement on the universal variable “page” which was altered by the translateIR() function. Translate IR works by reading the input light value as a hexadecimal, and comparing it in a switch statement to the known button values, and modifying the control variables as such. For the first page, we read the humidity, and append it to a character buffer in the form “Humidity: ##%”. The page number for the second row, as in all instances of the switch, uses the pageNumber() function to make a char buffer with the specified number at the 16th slot, using a for loop to fill it with spaces up to the intended point. The second page, depending on the state of the F or C variable, outputs text in the form “Temp: ##.#(C or F)”, and the page number on the second row. The third page works the same as the humidity’s page, though maps the counts of the analog read potentiometer to a backwards percentage (low count = high contrast), and prints in the form “Contrast: ##% ”, and the page number on the next row. Finally, there is a default catch case to match the enum. Crucially, the interrupt can occur at any time by pressing the button, triggering the powerHandler() function, same as the power button on the remote, which either powers or depowers the display, and swaps the power state variable. All of these work together to present the user three pages of data, and one with two options (page two, with Celsius and Fahrenheit). Overall, this works as expected, and has no known flaws.
Youtube Video:
Final Thoughts:
To conclude, this project has been the coolest thing I have made yet. It has a complete user interface, complex inputs from multiple sources, and a high-level programmatic structure under the hood. Indeed, this may live on my desk for a while as the product I designed. Overall, I have learned a ton about creating a project from start to finish, managing the finances and components, and learning new concepts on the fly to implement your ideas. YouTube ended up being a massive help throughout the design process. Looking forward, I hope to be able to present this project to possible employers, and make even cooler things in the future.